How do you paint varnished MDF?

Alan Chenkin,  Handyman and fixer of things.
 
I would definitely sand with 220 grit sandpaper first, and use a good primer. Why? Because MDF (even if it has a light coat of varnish) reacts to a finish like end grain wood, and will soak up the primer. Even if the varnish has good coverage on the wood, primer prevents any reaction between the varnish and the finish paint. once the primer is absorbed into the wood it should seal it, making the finish smooth enough to lightly sand again and apply a topcoat. (Some MDF may require 2 coats of a primer, like Kilz, or a white shellac). Sanding sealer will also work.
Once the MDF is sealed and sanded, lay down a light topcoat of glossy enamel with a good bristle brush (not a cheap brush). Here is a set of Purdy brushes.
If you have to roll a large area of shelving, the same rule applies. I would recommend a roller:
Work clean, the varnish may not come off completely, sanding it smooth and priming. Vacuum up the dust with a damp cloth or shop vacuum, and wear a mask!
You can get paints at a local hardware, paint, or “big-box” store. read all the instructions and drying times!
Best of luck with your project!
 
Thank you for reading my blog!

Should woodwork/home maintenance classes be mandatory?

In preparing a teenager for life, understanding the physical nature of things – by taking classes in woodworking, metalwork, Electrical shop, etc. – can better prepare that student for the “real world”.
It will also expose students to fields that they may not have an interest in, but will be valuable in their future.
There is no question that Many will find it boring or not germane to their lives, but how often do you use trigonometry in your daily life?
Since schools have cut shop and industrial arts from many of their curriculum’s, many graduates are compelled to learn everything from hanging a picture to building a deck from internet “how-to’s” or an orange vested clerk at a “Big Box” hardware store.
They really need to have some practical experience and understanding of tools, so that they can plan a project and see it safely to completion. Most important, when hiring a skilled handyman or contractor, they will have a better understanding of what they need, the actual work involved, and what it will cost.
I would love to see more schools with shops and courses in woodworking and basic home maintenance, but that is a factor of budget and the needs of the student population. We need more graduates who excel and basic math and have fluency in English, as well.


I was fortunate to have parents who were educators.  My mother was an art teacher in Brooklyn, at the Ovington School, PS 176, and my Father taught Shop at Thomas Edison High School in Queens.  This gave me a strong belief in the power of public education.  I also learned that building more schools is much cheaper than building more jails, in the long run.
Woodshop 101 For Kids: 21 Woodworking Lessons: Teach the Basics of Woodworking. 14 Woodworking Projects For Parents and Kids To Build Together
I hope my opinion and the other items I presented give you the basics to form an educated and informed opinion.
 

What are some cheap options for soundproofing a wall (can’t be permanent as it’s in a rental) that can also be styled to blend in with decor?

Alan Chenkin, Carpenter and “how to do it” guy. Making dreams happen with tools….
Here is a relatively inexpensive suggestion:
Make frames out of 1×2 pine, cover them with a simple fabric, like burlap and then glue/fasten foam sheets (even from the packing that items are delivered in, they can trap sound). Then you can either hang or lean them on the wall, and that should reduce some of the sound.
If you need even more soundproofing, consider Acoustic Panels Studio Foam Wedges 1″ X 12″ X 12″ Which can be stapled or fastened to the frames with 3M Foam & Fabric Spray Adhesive.  These foam panels are used in recording studios to cut background noise, and trap noise effectively.
You could also try these Amazon.com: soundproof wall panels , and fasten them with an adhesive that can be moved (Note: this can leave marks on the wall, but may be cleanable. use your judgement) Available on Amazon.com: spray adhesive repositionable.
Hоw to Sоundрrооf Anything You Can Think Of! Get Rid Of Noise And Enjoy The Silence
Best of luck with your noise control project!

Can you use wood from a tree that has fell naturally to make furniture from, I.e. not fresh cut, it could have been rotting for a while? Would I just have to cut away any rotten wood? If so how do you treat the wood for putting in your house?

By Alan Chenkin, Owned a cabinet shop for 10 years, is an avid woodworker.
One of the “Greenest” things you can do is recycle fallen wood for furniture

I would like to make a few points – First, fallen timber may not cut down to optimal sizes when you cut off insect damage and rot. This may mean additional glue joints and laying up small pieces to make larger panels. You also have to anticipate that the boards may have insect damage and spot damage that may need to be cut out or otherwise “worked around”.

If you mill the wood yourself, you need a chainsaw and a mill, like this:

 Portable Sawmill Aluminum Steel Chainsaw Mill for Builders and Woodworkers (14″ to 36″) Husqvarna 445E 18″ 45.7cc 967651004 Gas-Powered Chain Saw

Elm burl, a diseased wood, found in swampy areas, is also highly prized for its figure, and is excellent for furniture and veneer work.
The wood may not require any special treatment, except for conventional staining and finishing. I would suggest you make sure you don’t disturb any bees living in or around the log (surprises like that make for good stories, but be careful)!
Cabinet grade lumber is usually dried to a 6% moisture content.  To ensure that is is dry enough to finish, you will need to use a moisture meter:
4 Pin Digital Gardening Wood Moisture Tester Meter Damp Detector Tester
dead standing vs live wood – Woodworking Talk Discussion Thread
Tips for drying harvested woods: Dead trees, Storms, etc. – Lumberjocks Discussion Thread (Note: This is the link for the Cedarcide insect treatment mentioned in the Lumberjocks discussion for insect treating fallen timber. It’s available by the gallon from Amazon).
Always check the local laws to make sure you can legally harvest any dead fall lumber without risking a fine (if you found it in a state of local park, as an example). Some parks have restrictions on what timbers can be taken.
I hope I have added some good insight and you have the opportunity to build some great furniture!

How do you start to learn about carpentry?

Carpentry is a great skill to learn. Observe carpenters at work, and read “how to do it” websites. This will show you the basics.
Accumulate some hand tools, and a good tool bag or apron. Always remember, “safety first”.
I found this book indispensable, and keep a copy around so the ideas are fresh, especially on layout and project planning:
Consider going to a school, or joining an apprenticeship program.
This is one run by a community college in the US: Registered Apprenticeships
This is a good guide to keep in your toolbox:


Keep in mind that carpentry is a craft that takes years of work and practice to master, learn all you can, and you will do famously well!

What national or international standard specifies the 32 mm European frameless cabinet system (System 32, LR32, True32, etc.), where sizes are all multiples of 32 mm?

The 32mm system is designed to build cabinets quickly based on a metric standard that was born out of WWII ingenuity – as the machinery to build cabinets and cabinet hardware uses 32mm centers, and that was all they had in parts of Europe; tooling based on 32mm gears, bearings, etc.
While Americans (mostly) were comfortable with existing SAE (inch) standards, Europeans had a country to rebuild, and metric system + 32mm centers = fast rebuild. The hardware manufacturers drove a lot of the “de facto” standards, so that cabinet makers could use almost any hinge, drawer slide, or shelf pin.
Hardware manufacturers like Blum “wrote the book” on their version of the system Blum’s Process 32 Manual (PDF) (This is their downloadable manual).
The Architectural Woodwork Institute’s guide for casework references “European” Hinges.[1] The AWI is the Architect’s guide for cabinet construction.[2]
Here are some articles from the Web:
The “Kiss System” for 32mm cabinet construction. –
A Curriculum for Teaching 32mm Cabinet Construction – By Philip Lundgren, Kip Christensen, and Ronald Gonzales
Modern Cabinetmaking 5th Edition – by William D. Umstattd (Author), Charles W. Davis (Author), Patrick A Molzahn (Author) From Amazon Books
Modern Cabinetry: European Design & Construction Techniques – From Amazon Books (from 1995, but still relevant)
Bob Lang’s The Complete Kitchen Cabinetmaker, Revised Edition: Shop Drawings and Professional Methods for Designing and Constructing Every Kind of Kitchen and Built-In Cabinet –
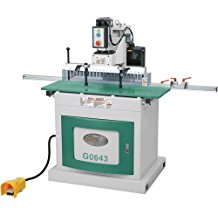
 From Amazon Books
Many of the panel saws, Boring machines, and edge-banding machines are made in Europe, and are metric-based. If I was to set up a shop, it would be using 32mm methods because tooling, production equipment, training, and maintenance are all expedited for faster construction. In European cabinets, you can finish the components laid flat, as opposed to finishing a completed cabinet; You can also ship it flat – like IKEA casework; almost all of which uses 32mm construction. In Canada, as an example, cabinet lumber and the plants that mill it into 32mm casework are next to the forests – and they can ship finished RTA (“Ready to Assemble”) furniture anywhere in the world, flat-packed and in boxes.  32mm fittings are available here.
Keep in mind that 32mm construction lends itself to large production runs; Short runs require fast change, quick setups, and skilled labor to deal with design variations and custom sizes; most production 32mm shops have a separate section with conventional tooling for “specials” and “one-offs”.
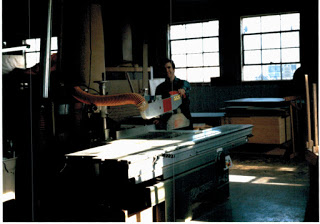
I hope I have added some insight to this topic – I opened my woodworking shop in 1980, all 32mm by 1983, and closed it in 1990 when IKEA and Home Depot came to town, changing the economics of the cabinet business (for me).
Footnotes

What’s the difference between an ordinary drill and a Dremel-style rotary tool?

Alan Chenkin, Trained as a Machinist/Mechanic in the NYC schools, Life long Mr. Fixit

The Dremel is better suited to craft or fine work, and is adaptable (with a multitude of bits and adapters) to hobbies, craft work, engraving, and more.  Power drills are typically larger, more powerful, and turn at a slower RPM with more torque than a Dremel rotary tool.
When I am on the job, I carry several drills, and keep my Dremel (and all its bits, polishing wheels, and cutters) at the shop. That is because I am usually working on larger projects that are not suited for a small Dremel tool.
Here is a huge set of Dremel accessories:
I don’t use my dremel a lot, but it is a unique and useful tool for polishing, work on small metal parts, drilling tiny holes, making jewelry, and fixing keepsake boxes and the like.  They key to a Dremel’s usefulness is the sheer number of bits and accessories you can get.  Look at the selection on EBay.
 
Have fun, and Dremel on!

What glue is really strong and dries instantly?

By Alan Chenkin, Uses glue all the time, for fun and woodworking projects

For light duty, regular super glue / Crazy glue will suffice.
Be careful not to get it on your hands, it can glue your fingers together!  (Hint – use nail polish remover to break it down or remove it.  Nail Polish remover is made with a solvent called Acetone).
If you need something stronger, use a 2-part Epoxy
Epoxies may take 5-10 minutes to set, but they are strong and durable when fully cured.  Use Epoxy with care, and make sure the surfaces to be glued are clean as possible.
Contact Cement – For bonding material with a larger surface area, like laminates:
Dap 00271 Weldwood Original Contact Cement, 1-Pint
Contact cement is applied to BOTH surfaces to be bonded, allowed to dry until tacky, then the surfaces are pressed together (you only get one shot – Contact cement is a “Glue to Glue bond”, and sticks fast and holds tight).  

Contact cement is applied with brush or roller, sticks to everything, like your fingers, so you have to be really accurate.  

Contact cement also requires a clean environment, you have to keep any dust or dirt from being caught under the material!  You also have to have good ventilation, and solvent to clean up.
Make sure the adhesive you use is compatible with the items you are gluing!
Thank you for reading my blog – I hope you enjoy it and find it informative! – Feel free to share!

What are some tools with legendary reputation for value and reliability?

This Tool:
milwaukee sawzall Amazon
The electric model. The Newer blades help keep up, but these workhorses are nearly indestructible.
Other companies make Sawzalls, er, “Reciprocating saws“,  but lack the rock solid reliability of this beauty.
I replaced mine a few years ago when the rubber nose piece got worn. EBay buyers fought over it, running the price up almost to retail. The battery ones are nice, but this is their Grand-dad, and has some well-earned chops.
The sawzall is a versatile tool for rough work; demolition, tree pruning, pallet deconstruction, you name it. Make sure you get good bimetal or carbide blades – you need them to keep up with the cutting power of the Milwaukee.

This one is for cutting/Pruning:
This is not a tool you use every day. Certainly not for fine work.
The “Reciprocating Saw” known as the Milwaukee Sawzall makes short work when retrofitting doors and windows (I have personally split a 2×4 -the long way- IN PLACE to fit a new door jamb, on multiple occasions). It is hard to kill, and the only maintenance I do is spraying the hot blade with WD-40 once and while.
The old ones have Hex keys to fasten the blades in place, newer ones have a “keyless” mechanism so you never have to go hunting for the Allen key, a time honoured carpenter tradition. Most of us kept a spare Allen key in the tool box and had one electrical -taped to the saw’s cord.

This is the “wrench screw and clamp set” . My sawzall used up one or two while I owned it.  I keep spares in the Milwaukee case.
The Milwaukee Sawzall. Tool of Legend.  
Disclaimer: I am not sponsored by Milwaukee or Freud, but I have their goods in my toolboxes.  I also own Ryobi 18 Volt reciprocating saws, because sometimes there is no outlet nearby.
Thank you for reading my Sawzall adoration, I hope you found it informative.  Feel free to share!  
Also Check out my other Blogs:

How do I degrease the front of a wooden bar or cabinet?

When confronted with woodwork that has been exposed to a lot of grease, cooking grease, oily substances, and “Schmootz”, You need to give the material a good cleaning before deciding to refinish.  

I like Murphy’s oil soap. However, if the front of the bar is real greasy, my preference would be TSP .

The process is described in detail here: How to clean your kitchen cabinets with TSP – Weekend Craft Journal, and here: TSP – Trisodium Phosphate: The Painter’s Degreasing Choice – from House Painting info.
make sure you follow safety precautions.  Use a mask, Gloves, and good rags.  Be prudent, and clean a small area first before you go “all-in” so you can test the results.  Make sure your windows are open and you take a breather every so often.  Cleaning can be challenging.
I also use TSP when degreasing around the major grease collecting areas in the kitchen; around and behind the stove, near the stove top vent, behind the refrigerator.  These places seem to get more nasty, dirty, grease buildup than anyplace else.
with a little bet of effort you will have that barfront sparkling!
Thank you for reading my blog – I hope you enjoy it and find it informative! – Feel free to share!